Saturday, July 9, 2016

Half Bath Reveal

I have FINALLY finished the half bath renovation! This tiny little half bath took over 2 months to renovate, but it was worth it. I didn't really intend to gut and completely renovate this bath. My plan was to only replace the toilet - the flange was broken on the old one, causing the toilet to rock. And since we were going to have to remove the toilet to replace the flange, we might as well upgrade to a nicer toilet that doesn't stop up all the time.   Then I started noticing that I just didn't really like anything about the room. This is what we started with - I'd already taken one door off before I remembered to take the "before" photos.


The builder grade vanity wasn't even the right size...they'd actually cut a notch out of the vanity top to make it fit.


I really tried to like the tile - I HATE removing tile. But Jon hated the tile too, and it looked terrible where they'd grouted around the door facing instead of installing it underneath the trim.


When we renovated the rental house, the actual tiles came up easily - it was the mortar/thinset that was hard to remove. So I started demo-ing the tile with a chisel and hammer. I quickly realized that this particular tile was not going to be nearly as easy as I expected. I worked FOREVER just to get this much done. There was no tile under the vanity, so this is only TWO tiles that took me forever to demo.


I found a few blog posts/videos that assured me a demolition hammer would take care of the tile and the thinset, so I rented one from Home Depot.


It took care of the tile, but the thinset still wasn't budging. I really didn't want to have to grind the thinset off because of the dust, but there wasn't any other choice. Because the room is only 3x8, I couldn't use a big floor buffer like we used on the rental house. Jon ordered an angle grinder and a diamond blade, and it cut through the thinset like buttah. Yes, the dust was horrible, but worth the extra clean-up just to have the stuff GONE!


With demo officially over, it was time for the fun part! I've never tiled before, but I thought such a small room wouldn't be too hard. After doing it, I've decided that a small room is probably harder than a bigger room just because there's not as much space to work in. Cutting the tiles was the hardest part. I used my Rockler VersaCut circular saw with a tile-cutting blade, which took way too much time and energy. If I ever do this again, I'll rent a wet saw! Plus (since this was a bathroom), I had to deal with the funky cuts for the toilet. But it turned out beautifully! I love this tile we picked up at Lowes.


Next came the "shiplap" wall. Since I couldn't find any real paneling that was as wide as I wanted, I bought a sheet of 1/4 inch plywood and cut it into 8 inch wide strips.  I used nickels as spacers between the boards.


I also had to move that light fixture a few inches - it wasn't centered on the wall.

Next came the new toilet, also from Lowes.  It's the American Standard Champion comfort height toilet - the one that can flush a bucket full of golf balls.


I wanted an open vanity to make the room feel bigger. I built this one using this plan from Ana White's site...I just adjusted the size to fit my room. It's built from pine 4x4's, 1x6's, 1x3's, and the top (visible in later pics) is a 1 inch thick pine panel.   I stained it with Minwax "Ipswich Pine" and then 4 coats of tung oil finish.


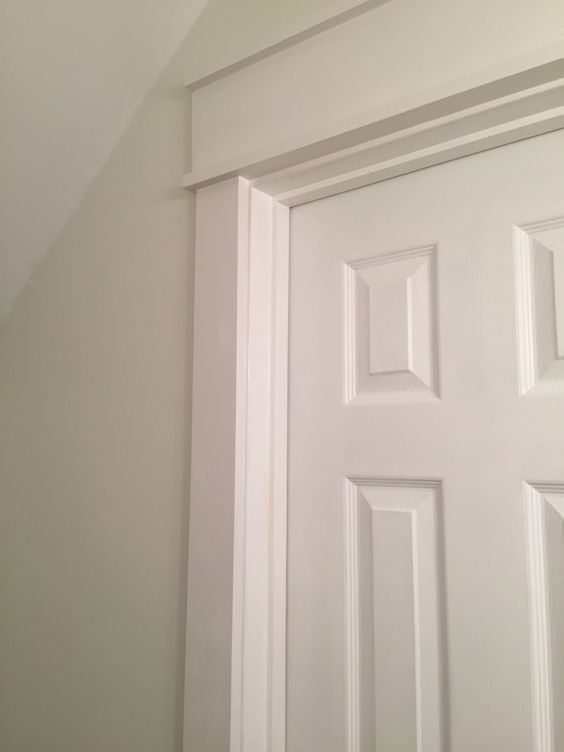
I took off the door facing and replaced it with farmhouse style trim.


I did this with 1x4, 1x2, and 1x6 boards - it is so simple and looks so great. I intend to eventually change all the facings in the house like this.

And now for the finished room....


My sand collection - from all the beaches I've visited recently. Hope to add a lot more to this collection!


Before and after


I'm so glad I did this now...it was quite a learning experience. I learned to lay tile and plumb a sink. Jon helped me get the vanity top out and set the new toilet in...everything else was all ME.


Sunday, January 24, 2016

Master Closet Reno

I wasn't planning to redo our master closet this soon. I mean, I definitely did not love the master closet, but there are so many other things to do in this house - painting, raised garden beds outside, new chicken run, kitchen reno, etc. Plus, after making the doggie room under the stairs, I was planning on taking a break before tackling the kitchen this spring. But when Jon complained about the state of the closet, that was a good enough reason to go ahead and get it done. Anyone who knows me knows that I have a thing about closets...they need to be functional AND look great.

The first house that Jon and I bought (the one in Cordova) had an incredible master closet. It was huge - about 8 feet wide by probably 15 feet (or more) long. Our second house's (in Oakland) master closet was just a tiny bit smaller, but still quite big. Our current house's master closet is pretty small compared to the last two (8ft x 5ft), but it's still big enough...just needed to make better use of the space. Since our current home does not have a linen closet in the master bath, one of the closet shelves was designated for towels and bathcloths. The first thing I had to do was make a new place for those. I made a pullout drawer for one of the bathroom cabinets - instant linen closet!


This is what it looked like before. These shelves were made out of pressboard. They looked ok, but the surface was rough in a lot of places. Each side had double hanging rods with a small space for long hanging clothes at the back. The long hanging was hard to access because the shelves were so deep. There wasn't much space for shoes, so the closet floor was always covered with shoes. The last pics are what bugged Jon...screws and holes all over the place and the carpet.


Demo on this closet was awful! All the screws were 3 inch screws, and most of them were stripped and had been painted over. Jon had to help me on some of the demo, because some of those screws just wouldn't budge. After everything was removed, I patched the holes in the walls.

I built the drawers first. They are the same width as the previous shelves, but they are not as deep. Scarlett was my little helper when I was building the upper shelves.


I love a nice, white bright closet, but I decided to line the walls behind the clothes with cedar planks. The main reason I went with cedar is because it's a natural insect repellent. Our bedroom is on the side of the house near the woods, and we found several brown recluse spiders on our bedroom floor shortly after we moved in. Getting rid of the overgrown flower bed outside our bedroom (and pest control) helped a lot with spiders - I haven't seen any for some time now. But one can never be too careful...I have a fear of spiders crawling into shoes....
Cedar also absorbs excess moisture in the air. Our closet is between our bathroom and the laundry room. We don't have a problem with mold/mildew on our clothes, but I figured it couldn't hurt anyway.


Since the closet shares a wall with the laundry room, I was able to put in a little laundry chute below the upper shelves. It's just a little window into the laundry room...there's a laundry basket on the other side of the wall to catch the dirty clothes. No need to keep a laundry hamper in the closet anymore :) I still need to make a door to cover it...the draft that comes through there is cold!


I will probably redo those drawers someday. This was only my second attempt at ever making drawers, so they aren't exactly perfect. They work just fine for now though.

My side has long hanging and double hanging rods. Jon's just has double hanging rods all the way across. And yes, this closet is staged. I didn't put all our clothes in for the pictures - it looks neater when it's not packed full.


Shelf for hatboxes and a new floor to replace the old carpet.


Jon's side has a valet rod and a shoe tower all the way up. No more shoes on the floor!


I love our new closet! I didn't think I'd ever get it finished, but it was worth it. Jon was very patient living with all our clothes all over the bedroom while I worked on this.

Thursday, November 12, 2015

Sliding Barn Door

I have another finished project! I've been wanting to make a sliding barn door for the laundry room since we moved in last year. The swinging door that was there blocked a closet in the laundry room when opened. For convenience, I took the old door off, planning to put up a sliding one. Now - a year later - it's done!

Making this barn door was pretty simple. It took much longer to measure, decide on the style, and paint than it took me to actually build it. Since you can find instructions on building your own barn door all over Pinterest, I'm not going into detail on how I did it. Here's the door before painting.


And here is the finished/painted door.


I absolutely love it! I don't know why I waited so long to get this done.


The sliding door hardware I ordered online from Home Depot. It was much less expensive than anywhere else I checked, and it works just fine.

Now on to the 300 other projects on my list.